Black and White Points tool :
It is the perfect tool for doing such a correction with the Digi Grey.
- Make a copy of the reference photo (the one where is photographied the Digi Grey) and work on the copy. To make a copy, open the reference photo and save it under another name with the .psp or .pspimage file type (-> File -> Save as). To work on the copy is absolutely needed. If you modify your original reference photo, you will lose all possibility to correct the colours.
- Open the copy to the reference photo.
- Activate the "Black and White Points" tool.
In PSP X, this tool has been removed from the default workspace. To bring it back again do the following:
-> View
-> Customize
->"Commands" tab
-> Categories
-> Unused commands
-> Click on "Black and White Points", maintain the mouse button down and drag it on the menu title "Enhance Photo" on top of the screen.
This menu will open and you place the "Black and White Point" tool on the bottom of the list.
-> Close the "Customize" window.
- Click on the "Black and White Points" tool in the "Enhance photo" menu:
- Reset the tool:
- Click on "Preserve lightness" and uncheck "Balance to grey":

This will force PSP to correct only the coulours and not the luminosity.
- Click on the Zoom icon for adjusting the size of the displayed image in the preview windows:
- Use the Pan icon to make the Digi Grey visible in the preview window:
- Click on the Grey dropper icon:
- With the dropper, click on the grey of the Digi Grey in the left preview window (Before):
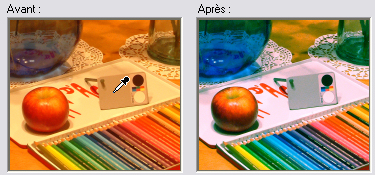
In the right preview window (After), the colour correction is displayed immediately. Click on OK to apply the correction on the photo:

With PSP 9, the first click with the dropper must be done in the image open in the workspace and not in the Preview window. It is a bug that has been corrected in PSP X.
For photos which don't have a great color cast, to click on the grey is sufficient and give good results. When the color cast is extreme, like in our example, to take the measure on the black and white areas too is advised before to click on OK:
- Click on the white dropper:
- With the dropper, click on the white area of the Digi Grey in the left preview window: 
- Click on the black dropper:
- With the black dropper, click on the black area of the Digi Grey:
- Cick on OK to apply the correction. You may close the reference photo.
- Here is the result:
- It is easy now to correct the other photos taken under the same lighting. Open them and click on he "Black and White Points" tool.
- In the Settings, click on "Last used":
The correction made on the reference photo is still in memory. To select the same correction, click on "Last used" without to use the dropper anymore...
- Click on OK to apply on the photo. Do it for each photo.
- If you have many photos, you may record in a script the setting made on the reference photo and apply it with a batch process.
Remarks :
Other tools are available for correcting the colours in PSP with the Digi Grey, for example "Manual Color Correction" or "Color Balance". The last one is a new tool introduced in PSP X.
You may also use in PSP the free PowerRetouche
plug-in.
|