The Levels Tool :
- Make a copy of the reference photo (the one where the Digi Grey is visible) and work on the copy. To make a copy, open the reference photo and save it under another name in the .psd format or .bmp or .tif (-> File - > Save as). To work on the copy is compulsory because if you modify your reference photo you cannot make any more correction with the Digi Grey.
- Open the copy of the reference photo
- Activate the "Levels" tool :
- > Image
- > Settings
- > Levels…:
- The "Levels" tool is displayed like this:
You will use the three visible Droppers on the bottom right.
- Click on the "Black Point" dropper:

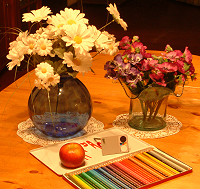
- Click on the black area of the Digi Grey visible in the reference photo:
- Click on the "White Point" dropper:
- Click on the white area of the the Digi Grey:
- Click finally on the"Grey Point" dropper:
- And click on the grey of the Digi Grey:
- Click on "Save" for recording the correction:
- Give a name to your Levels settings. Select a folder of your hard disk and click "Save":

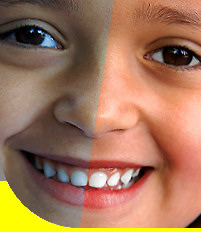
- The result obtained by the Levels settings is the following:

- To process your other photos realized under the same lighting, it is very easy. Open them and click the "Levels" tool. Then, load the correction made on the reference photo:
- The correction will be immediately visible and you will just have to validate by OK to apply it without having to use the droppers.
- Make it for every photo.
- If you have many photos to be processed, you can record in a script the correction made with the reference photo. You apply then this script to all the photos to be processed via:
- > File
- > Automation (?)
- > Batch processing
Remarks:
It is possible to make a more precise correction by using the Curves tool. The method using Curves is described here (in English):
http://www.outbackphoto.com/workflow/wf_65/essay.html
You can also use in Photoshop the free "plugin" PowerRetouche. |