Download :
Windows version (.zip file 7,2 MB)
Macintosh version (.sit file 5,8 MB)
Installation :
Unzip the file and run the installation program. The white balance Power Retouche filter needs to be placed in the "plugin" folder or its equivalent of your graphic software. After the plugin is installed, launch your graphic software.
Explanations for the .zip Windows file:
- Unzip the file
- You get an installation file named WhiBalPR.exe
- Dubble-click on this file for launching the installation.
- "Welcome" winow : click on "Next"
- "License Agreement" window : click on "YES" then "Next"
- "Readme" window : click on "Next"
- "Choose Destination Location" window :
The installation program proposes a folder by default:
C:\Program Files\Plug-Ins\PowerRetouche
Use the "Browse" button to choice the "plugin" folder of your software :
Photoshop 7 :
C:\Program Files\Adobe\Photoshop 7.0\Modules externes
Photoshop Elements 2 :
C:\Program Files\Adobe\Photoshop Elements 2\Modules externes
Photoshop Elements 5.0 :
C:\Program Files\Adobe\Photoshop Elements 5.0\Plug-Ins
Paint Shop Pro X :
C:\Program Files\Corel\Corel Paint Shop Pro X\PlugIns
Photo Paint 12 :
C:\Program Files\Corel\Corel Graphics 12\Plugins
PhotoImpact 12 :
C:\Program Files\Ulead Systems\Ulead PhotoImpact 12\Plugin
Gimp 2.2.13 :
C:\Program Files\Gimp\config\plug-ins
Another method of installation is to accept all the default options. The plugin will be installed in a PowerRetouche folder. This folder holds all the necessary elements the permit the plugin to function. You may copy those elements and paste them in the plug-in folder of your software. If you use different softwares, you may copy the PowerRetouche folder content in the plug-in folder of each software.
Remark :
During the installation,other filters are installed. They are demo filters. They are functional too but display the "DEMO" text on the images.
Utilisation :
- The working window is like this:

- To display the marble background, click on "Marble":

- The filter is set by default for on Auto Exposure (luminosity). During the following explanations, we have unchecked this setting:
But you may let it checked if you want to have an auto-correction of the luminosity.
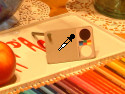
- Click on the Grey dropper icon (Mid Grey Rect.):
- Click on the grey of the Digi Grey in the preview window:
- The result:
We don't used the black and white areas because we have observed that this plugin tends to increase the contrast when it measures the black and white areas of the Digi Grey. Clicking on the grey is enough.
Save the setting with "Save".
For applying the correction on the other photos, load the setting with "Open".
If you correct your other photos immediately after correcting the reference photo, no need to save the setting. The filter memorizes the last setting. You only need to open the other photos in the filter and click on "Apply".
This plugin tends to desature the image when applied on an image with an extreme color cast (like our example). You may reduce this effect while playing with the "Retouch levels" sliders:
You may also increase the saturation in your photo retouching program.
|